Thursday, March 31, 2011

Project Idea Overload

I’m feeling burnt out today and rather unaccomplished. I didn’t get anything done last
night which is frustrating to me. I’m also frustrated by the number of ideas that I have in
my head that I haven’t had time to do. Maybe sharing my ideas will make me feel better.
Here we go…

My Haphazard List of Ideas

  • Make a work table using slab doors and sawhorses
  • Paint Charlotte’s playroom door with chalkboard paint
  • Make shelves with yardstick
  • Paint and decoupage my office chair
  • Create a gallery wall in the living room
  • Make decoupage letters for the kitchen
  • Strip, paint and stain or bedroom dresser
  • Make light out of antique window
  • Make a wooden crates for kitchen
  • Learn to sew a cloth doll
  • Make a reading tent in Charlotte’s playroom
  • Hang sheer curtains in our bedroom and move our bed
  • Remove and create my own labels for our spices
  • Finish my drop cloth curtains
  • Make pillows for our couch
  • Paint all of our hallways gray
  • Paint our full bathroom white and oval/round Oil Rubbed Bronze mirror to replace the matchy, matchy rectangular wood one.
  • Remove closet door in master bedroom and replace with a curtain
  • Staple chicken wire to the ceiling of the work shop
  • Paint the purple office wall with chalkboard paint
  • Make felt flowers for the lamp shades for the lamps that I purchased last summer that I still have not painted
  • Make stump chargers for my BFF’s bridal shower
  • Make hand stamped jewelry
  • And the list goes on and on and on and on…..

Please do not be confused. I’m not saying all of these are good ideas but rather just
what pops into my head on a daily basis. I apologize if I have passed any of my anxiety
on to you by allowing you to read my inner ramblings. Maybe if I can just get my kitchen
done I can work on some of these other ideas…..
What ideas have you been thinking about today?

PS – Happy 1st Birthday to my adorable godson Cooper!


Isn’t he the cutest?

Tuesday, March 29, 2011

DIY Library Bag


About a month ago I took Charlotte on her first trip to our local public library. It was a total success and she loved looking at all of the books and picking out a few to take home. When it was time to check out the books, Charlotte wanted to carry them to the car. I didn't have a bag so the librarian handed us a plastic bag. My girl carried the bag all the way to the car. I knew I needed to have a special bag for our library trips. At the same time that we began going to the library, Charlotte began painting. I thought this would be a great opportunity for her to put her own personal touch on something. I bought some acrylic paint, cheap paint brushes, and a canvas bag and let her go crazy.

I taped plastic bags down for a drop cloth. I always have an excessive amount and thought this would be a good way to reuse them.

Here's my girl at work. Sorry it's blurry. I was having issues. :)

After she was done with her "masterpiece" and it had plenty of time to dry I sparingly applied some hot glue around the top edge of the bag and attached some ribbon. I truly wanted this bag to be something that Charlotte had "designed" so on a trip to Hobby Lobby I had her pick out a spool of ribbon that she liked and that was the ribbon I used.

Once I had attached the ribbon I decided that I wanted to add an inside pocket to keep our library card in. For this step I used random pieces that I had laying around. I used fabric and ribbon that was left over from my Memo Board, a random button, Charlotte's ribbon, and some hemp cord. I forgot to take pictures as I went but I basically just hot glued ribbon around the edges so that I wouldn't have to sew anything. It wasn't until I was done with the ribbon that I decided to add the button. The card didn't fit as snug as I would have liked and I was afraid that it would get lost.


I'm so proud of the art work that my peanut creates and love being able to carry it around. Not only does it make me smile but it also makes my girl happy. I love hearing her say things like "Mommy, I did that." I want her to be proud of the things she creates and I definitely think that allowing her to carry her painting around with her will help build her self confidence.


 What crafts have you done with your children lately?


Monday, March 28, 2011

Crafty Spring Cleaning

When I say Crafty Spring Cleaning I'm not sure if I mean crafty as creative, or crafty as in cleaning my craft box. Maybe it's both. When I visited Centsational Girl today and saw that she was hosting the Fair Weather Forum I knew I wanted to participate but didn't have anything "Spring" in mind for today. All day long I kept trying to come up with something and couldn't. Perhaps I was too distracted by the complete and utter disaster that is my dining room turned cabinet painting room. Yes, I am still painting cabinets. Anyways, after racking my brain all day I pulled out my craft bin hoping that I had supplies to make something spring like.


My craft box has been nagging me for months. Every time I would go to work on something I would buy new supplies because I wasn't sure what I actually had and didn't have the time to sort through my bin. Honestly, it was atrocious but Charlotte was asleep and I couldn't go to the store so I had to pull it out. After one glance it hit me. Spring Cleaning my craft bin was the perfect idea. I had a post to link the the Fair Weather Forum and I got to organize my bin so I no longer have to ignore it and pretend it doesn't exist.


Within five minutes of starting I found things that I didn't even know were in there. I'm pretty sure this fusible webbing and Heat 'n' Bond are my Mothers but I may have to find a use for them. I'm actually interested to see if they still work because they look pretty dated. Time will tell.


Any who, after digging everything out and sorting, I had a dining room table (in my living room) that looked like this. Oh and you even get to see the dining room disaster that I mentioned. My house is seriously chaos at the moment. I'm not sure how much longer I can take it. The plus side of me feeling annoyed with the clutter is that I'm picking up speed with painting because I just want to be done with the cabinets.


Now you may be wondering why I would think that this may be crafty as in creative. Well, once I had emptied the contents of the bin I realized that I needed to organize the junk supplies somehow before dumping them back in. While redoing the kitchen I have come to realize that I have too many plastic containers for leftovers. I needed to get them out of the kitchen but didn't want to get rid of them because I find them to be rather useful. I kept my good Rubbermaids in the kitchen and re-purposed our saved take-out containers for craft organizers. Perfecto! As you can see I feel rather clever that I used take out containers for organizing. I'm sure I'm not the first one to do it but let's not burst my bubble.


I'm feeling much better about getting this bin organized. Now I just need to finish this darn kitchen so I can move on the spare bedroom (soon-to-be project room). Once that's complete my supplies won't even need to live in this bin! I swear, there just aren't enough hours in the day to get everything done!

If you haven't noticed already I'm linking this post to CG's Fair Weather Forum. Stop over and check out all the wonderful entries!

How's your spring cleaning coming along?

Sunday, March 27, 2011

Hotel Inspiration

Hi all! I hope you had a great weekend! Last week I traveled to Foxwoods Resort and Casino in Connecticut for a work function. Hubby and I had traveled there to spend a few nights after our honeymoon. For both occasions I stayed in the MGM Hotel. My coworker and I stayed on the top floor and shared this spectacular view...


It's amazing to me how a resort like Foxwoods is located in such a rural area. While I'm sure this view would be even more lovely if the trees were filled in, changing colors, or glistening with snow I still enjoyed looking out over the tree tops.

The rooms themselves are also quite spectacular. After spending a night in the hotel bed I'm seriously contemplating splurging on high quality sheets. They were so comfortable! I had a hard time pulling myself out of bed in the morning.


I also struggled to pull myself out of the wonderful spa bathroom. Next time I remodel a bathroom I want my shower to look like this...


And here's me goofing off in the bathroom while getting ready for dinner...


Another thing that I couldn't help notice was all of the wonderful light fixtures throughout the resort. I think part of what makes them so grand is the sheer size of them. They are truly enormous. This a picture I snapped in the lobby while we were waiting to check out.


While we there we had the opportunity to dine at David Burke Prime. The food was to die for! Everything from the Kung Poa Chicken to the Green Beans was nothing short of being truly scrumptious. Aside from enjoying the cuisine, I drank some fantastic Pinot Noir as well.


This is a peak at the phenomenal wine cellar at David Burke Prime. It's two stories high! And that glass blown light fixture is awesome!

While I am not a gambler I do enjoy the atmosphere and the luxuries involved in visiting. Perhaps someday I will get to spend more time enjoying this resort.

What are some of the luxuries that you enjoy when staying in a hotel?


Wednesday, March 23, 2011

DIY Memo Board

Hello, hello! I am finally able to share with you all, my DIY memo board. I had mentioned in my post on Monday night that I wanted to share a Before & After with you yesterday. Unfortunately, I didn't pull through. I decided to embellish the board a bit more than I had originally intended to do which required more time. Sometimes I'm not sure whether my plethora of ideas is a blessing or a curse. I get so many thoughts running through my mind I'm not sure what to choose. In the end I went with something much brighter and more playful than my original plan.
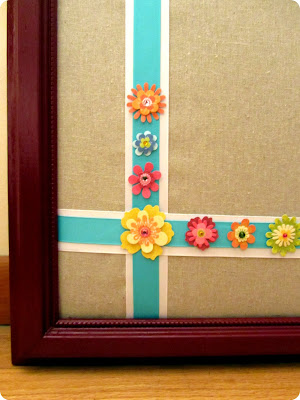

For a while now, I have found myself looking for somewhere to stick ideas, paint swatches, and other pieces of inspiration. The perfect solution for this was the not-so-original idea of a memo or bulletin board. I didn't want to go out and purchase one but rather decided that I should just make one from an old framed picture we had laying around the house. Someone had given it to us and it was just collecting dust in the spare bedroom.


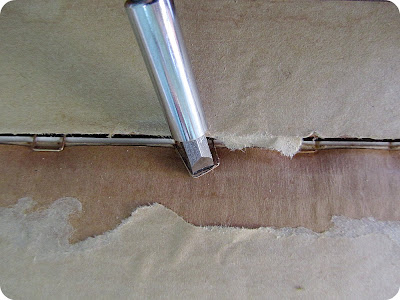
This first thing I did was remove the paper backing. Once that was done I began removing the staples that held the picture in place. To remove the staples I just wedged a Flathead screwdriver in between the staple and the frame and lifted the staple out.


I worked my way all around the perimeter and ended up with a mess that looked something like this...


Neat is something that I most definitely am not when I get working on a project. Things are more fun when they're messy! After I was able to separate the frame from the picture and glass I lightly sanded the entire piece. Once I was done sanding I wiped it down with soapy water and allowed it time to dry. Once it was dry I coated it with two coats of Claret Wine in a Satin Finish. I didn't bother to prime the piece because I don't expect it to endure that much wear and tear. Also, I like when things look a little bit beat up. Gives them character.  After spraying the frame I move to make the actual bulletin board. Now I had contemplated buying real cork board to cover with fabric but because I am cheap  frugal I stuck with my original plan and just used cardboard.


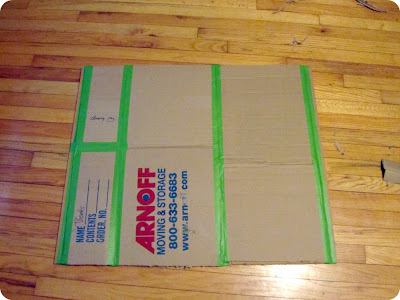
The frame already had one piece of cardboard that was used for the backing but I wanted to reinforce it with another layer to ensure that any tacks stick. I had a empty cardboard box laying around so I cut it down to pieces that would fit the original piece. Once I had all of my pieces cut I used tape to attach the pieces to the front piece and moved onto attaching my fabric. I used a hot glue gun and worked my way around the edges.


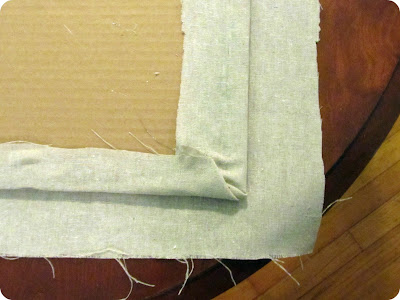
For the fabric I used two layers of cotton that I got at Joann's for around $4 a yard. I tried to find a pattern to use but wasn't able to find something I loved. I think I'm glad I used a neutral fabric because it will give a better backdrop to my other pieces of inspiration.


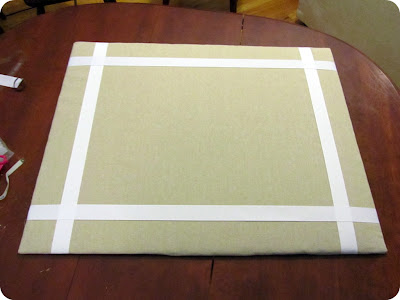
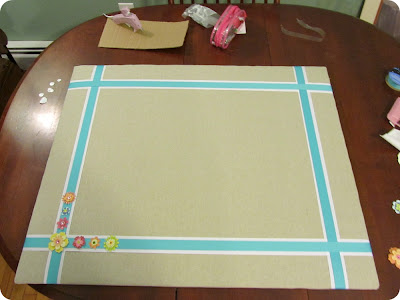
When I reached the corners I simply folded the fabric flat and glued it down flat with hot glue. Once both pieces of fabric were secure I cut 4 pieces of white grosgrain ribbon to place 3 inches from all the edges and attached with hot glue on the back of the cardboard. I did not flip the piece over for this because I wanted to ensure that the ribbon stayed straight. I simply placed a dot of hot glue on the end and lift the board to flip the glued edge under and held it for a minute until it was secure.


I hadn't planned on adding any further details to the board but looking at it almost put me to sleep! It was so boring. That is when I decided it need something else. This is going to be placed in my office/crafting area so it needed to be more creative and inspiring, not boring! I made a trip to Walmart and picked up more grosgrain ribbon and some colorful flowers meant for scrapbooks.


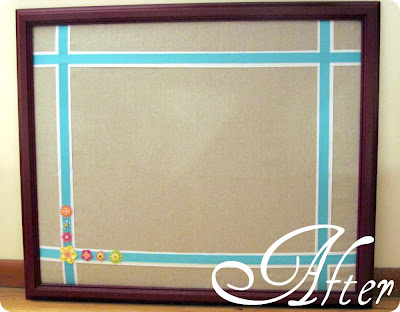
Now that is more like it! The last step was to just place the board inside the frame and secure it with either staples or tape. I'm not going to lie to you. I have yet to actually secure the board in place but I am going to be out of tonight tomorrow night and I was too anxious to share my end result.


I can't wait to hang this up above my desk and place some pieces of inspiration up there along with pictures and whatever else pops into my head! It will definitely be put to good use!

What do you think? Do you use a bulletin board or do you have other ways for keeping track of things?


Tuesday, March 22, 2011

Accidental Haggler

I want to apologize in advance for anyone who is dropping by to see the Before & After I mentioned in my last post. I decided to make some changes and wasn't able to finish in time. Next time though! I'm putting the finishing touches on it tonight! Now onto how I became an Accidental Haggler.

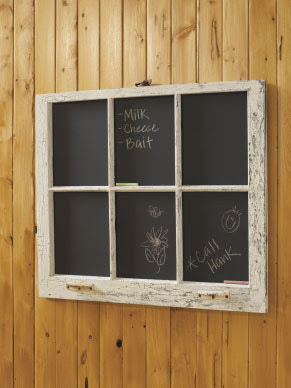
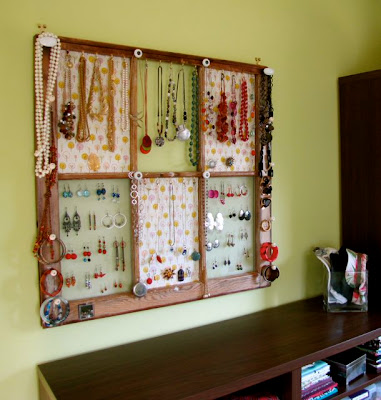
For a couple of months there have been antique windows sitting outside the back of a bike shop next to the Dunkin Donuts that I frequent by my work. Each morning I would sit in line at the drive thru wondering what the shop was planning to do with them. For weeks they sat there untouched. Finally, one day, several weeks ago I worked up the courage to go in and ask the Store Owner what his plans were for them. His response was this, “I sell them to antique collectors and artists. Do you fit either of those criteria?” My response was this, “Uh, sort of?” I wouldn't call myself either of those things but I wanted these bad boys in the worst way.


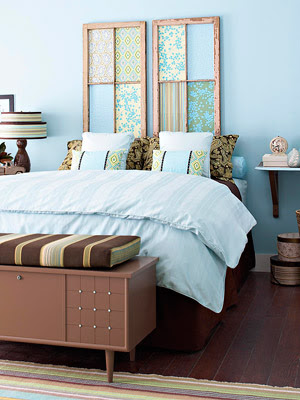
Despite my unconvincing response he took me out back to show me the goods. He asked me what my plans were for them and rather than spouting off the ridiculously, erratic list of ideas in my head I simply told him I planned to use them for a headboard. He seemed pleased with my answer. I asked him how much he wanted for them and he told me that he typically sold them for $25 a piece. My heart crumbled. I told him that was more than my budget would allow me to spend, swept my heart up off the floor and turned to walk out. I was not trying to talk him down because I didn’t think he would go for it. I wanted 5 windows which would have cost me $125.


Then a miracle happened. Okay, maybe not a miracle but something really exciting! He asked me how much I could afford to give him. I told him 5 bucks a window and he AGREED! He told me he was in a good mood and I could take 5 windows home for $25 dollars. I wanted to squeeze him but I held my composure, handed him the money and loaded my pretties into the back of my truck. Once I was in my truck I nearly had to pinch myself because I could not believe what had just happened. I haggled! Well, sort of. It wasn’t on purpose but he dropped his price $100 and now they are mine all mine! I haven’t decided what I’m really going to use them for but I have seen lots of ideas and have a few of my own.


 Seating Chart via Brenda's Wedding Blog

Mirror via Crafty Nest

 Chalkboard via Cottage Life

Jewelry Board via The Borrowed Abode


What do you thnk? What would you do with them? I have some other ideas in mind but I'm not sure if they'll work out or not. We shall see! :)

Monday, March 21, 2011

Taking A Risk: Painted Cabinet Style

Today over at The Nesting Place there is a linky party going on! It's about taking risks. This honestly couldn't have come at a more perfect time for me. Lately, I have been taking plenty of risks (for me anyways!). Two weeks ago I (finally) started this blog. I have been considering doing this for many, many months but kept being too chicken to take the plunge. I wasn't sure that I was capable of doing it. Now it's two weeks later and I already can't quite figure out why I waited so long. What did I have to lose?

Aside from starting this blog, I have taken other risks such as, ripping down cabinets as a first step to revamping my kitchen. The second step I took was partially influenced by The Nester's post regarding taking risks in your home. After reading her post I made this comment on her blog...


...and stayed true to my word! The next day I went to town painting my laminate countertops, which you can read more about here. I had planned on linking up to the party with that post but I dove into yet another project in my kitchen. (I'm feeling motivated!) Painting my kitchen cabinets!

I have never loved our cabinets. There is nothing functionally wrong with them but I was never a fan of them. When we first moved in I tried to convince myself into liking them by changing the hardware to Oil Rubbed Bronze knobs but it didn't help. I even toyed with the idea of just changing the backsplash. After almost a year of living with them my feelings haven't changed.


I have wanted white cabinets since before we even owned a home. The Hubby isn't overly fond of white cabinetry but agreed to letting me paint them in an attempt to make our kitchen more aesthetically pleasing. After reading this post over at Centsational Girl's I thought I would put Rustoleum's Cabinet Transformation's to the test.


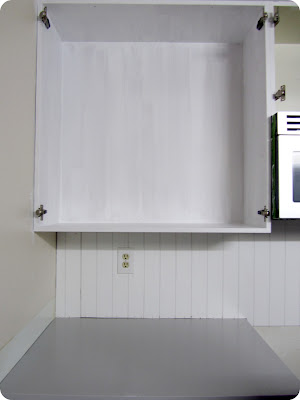
I purchased the kit from my local Home Depot and had it tinted to Pure White. According to Rustoleum they recommend using two coats of the tinted base. The above picture is after the second coat. This obviously won't do. Onto a third coat. If any of you are familiar with this product you know that it does not cover painting the interior of the cabinets. Unfortunately, this cabinet requires that the interior be painted because it has glass doors. (This is definitely the only time that I have considered it unfortunate to have glass doors! I love them for displaying my dishes and stemware!)


This is definitely a very slow and tedious process, despite not having to sand or prime my cabinetry. I spent my Friday night watching Fried Green Tomatoes and Waitress while deglossing cabinets for approximately 5 hours and I didn't even finish! I was hoping to have the cabinets painted by the end of the weekend but because I am going solo on this project it just didn't happen. Hopefully by weeks end I will have my kitchen functioning again!

At this point I'm not sure whether my risk is going to pay off or not. I'm sure hoping that it will. Hopefully I can share my success with all of you soon!

PS- I'm hoping to share a Before & After tomorrow so make sure to drop by!

Before & After: Timber!

Happy Monday Everyone! I'm so excited to share pictures of some of the happenings around my house over the weekend! On Saturday, my parents stopped by on there way to Lowe's and I couldn't resist tagging along to pick up some supplies for a refinishing job I plan to start this week. On my way home I called Hubby to see what he was up to. Our conversation went something like this...

Me - "Hey, what are you doing?"
Hubby - "Just getting some stuff done outside."
Me - "Alright, I'll be home in a few minutes."

I was thrilled that some outside work was getting done. Boy was I in for a surprise! I came home to this...


What are they looking at?

That would be my Hubby up in a tree!

Our front yard has been the home to two very old and ugly, dead pine trees but while I was out Jeff recruited two of his friends to help take them down. (Don't worry they have experience!). These trees were old, tall, and completely scary on windy days. I am loving this "Before & After" because we no longer have to worry about these trees crushing our Home Sweet Home!

Eek!

Yay!

That is much better if you ask me! And now, because I couldn't resist, here are a few snapshots of my babies from this weekend!


Aren't they cute?! I think so! :)

Check back in tomorrow for an update on my kitchen! :)

Thursday, March 17, 2011

My First Rendezvous with Refinishing

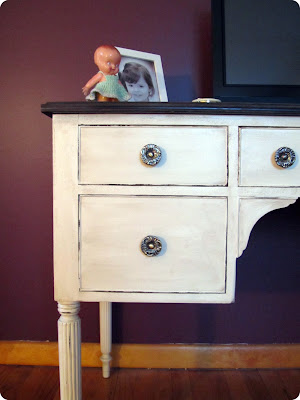
Hi All! I'm keeping it short and simple today. It's Furniture Feature Friday over at Miss Mustard Seed's so I'm linking up for the first time. I'm so excited to finally be participating after sitting on the sidelines for so many months! Want to know what I'm linking? Here's a peak but be sure to read on to see the rest!


Several months ago I purchased a desk off of craigslists to place in our loft/office area. The desk had great details but the finish was very worn and needed some TLC. Amongst all of my excitement to get started on my very first refinishing project I never snapped a before picture. Bummer! (Sadly this is not the only time I've done this.)  To give you an idea of what it looked like it was stained very dark and had an Art Deco finish.  Typically Art Deco is not my thing but for some reason this piece totally pulled it off.

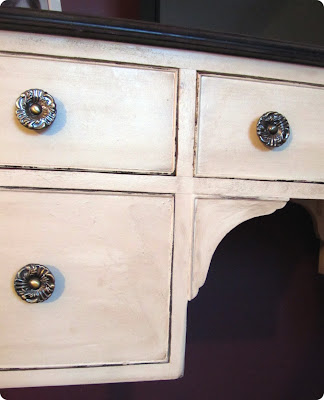
I had originally planned on sanding the entire piece and restaining but quickly realized that I did not have the patience time or tools for such a job at that point. I pondered for a while after deciding against sanding the entire piece and finally decided to stain the top with Minwax's Dark Walnut stain and use Rustoleum's Heirloom White for the body. After envying so many transformations around blogland that featured dark stained tops and crisp white bases I decided this was my chance to try it out. Now I have to apologize for some of these pictures because they are truly craptastic. However, they are all I have to share at the moment. Here they are in all of their craptastic glory.


I personally think that despite my less than stellar photographs the desk is a true beauty. However, I may be slightly biased.


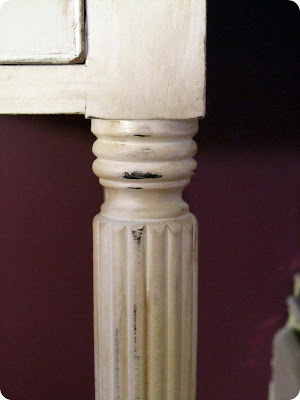
I also used the Dark Walnut stain as a glaze overtop of the Heirloom White. Once I had finished with the staining and painting I then worked through the piece and distressed some areas with sandpaper.


I replaced the old wooden knobs with these pretty Antiqued Brass knobs that I purchased at Home Depot for about 2 bucks a piece.


Overall, I am totally thrilled with how my desk turned out. In the end I believe I spent about $60 at the most to complete the entire project. Not too shabby if I do say so myself!

 I hope to make some progress on my kitchen this weekend to share with you all next week. Wish me luck!

Have a great weekend! :)